


Introduction
The polymerase chain reaction (PCR) stands as a foundational method in modern molecular biology, allowing scientists to amplify minute DNA sequences exponentially. However, the extraordinary sensitivity of this technique comes with a major drawback: a high vulnerability to cross-contamination. Establishing a brand-new pcr lab from scratch requires meticulous planning to safeguard against false-positive results. This guide breaks down the essential principles of spatial design, outlines a core pcr laboratory equipment list, and details contamination control protocols to ensure your molecular workflows operate seamlessly.
Designing Your Workspace: Separating Pre PCR and Post PCR Zones
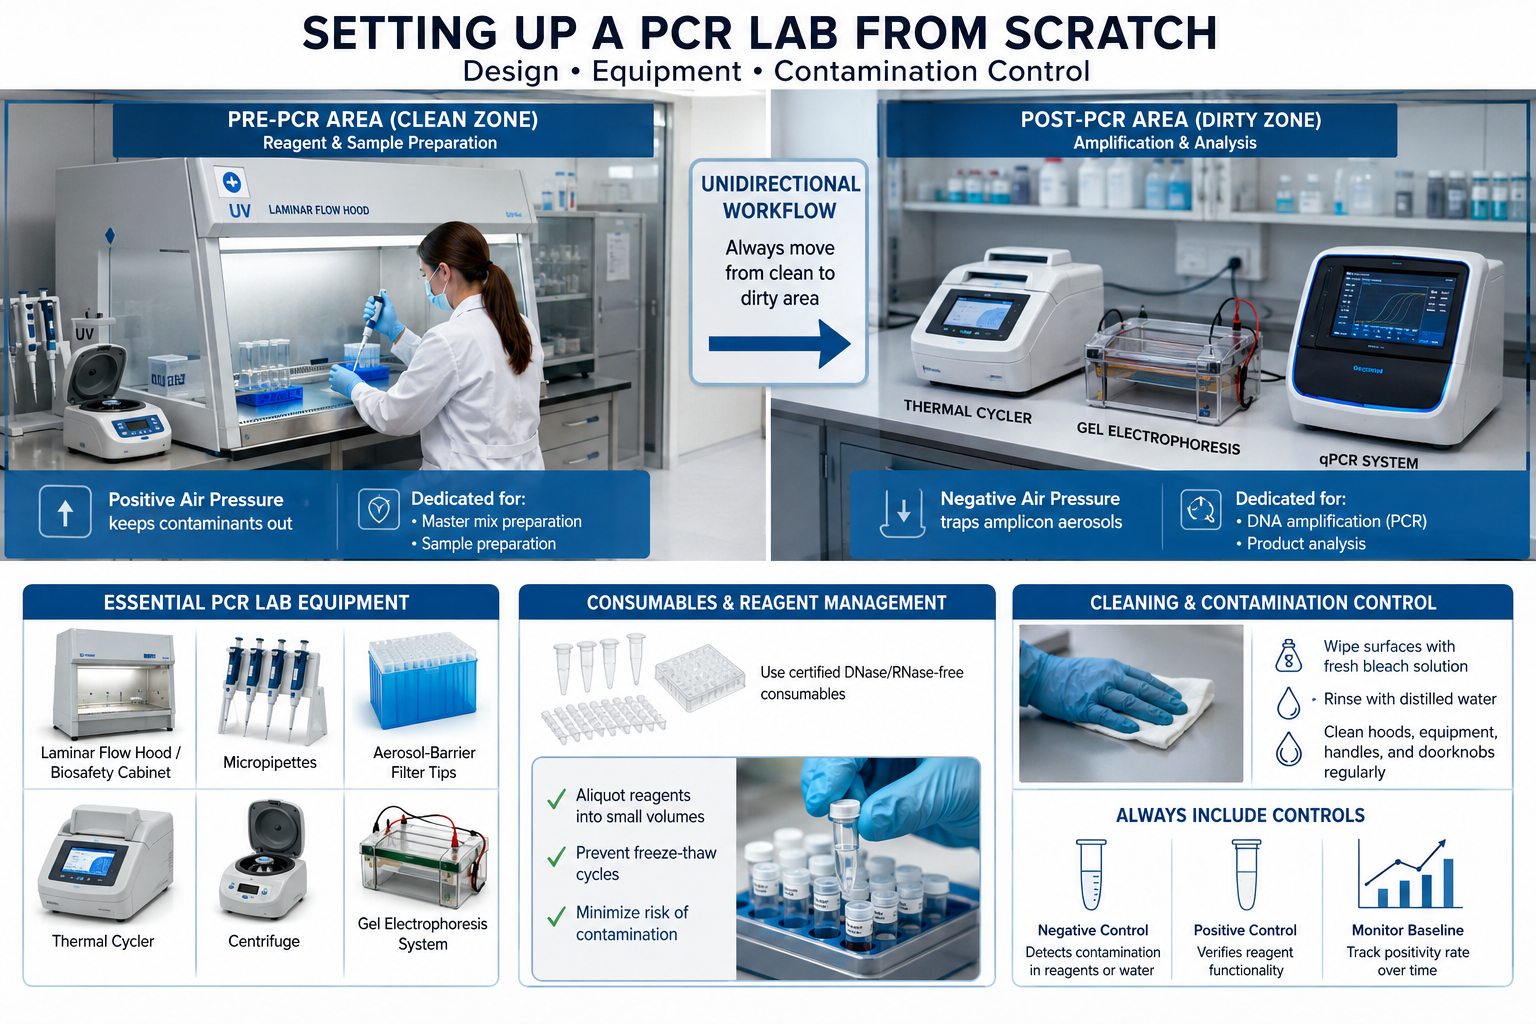
Because PCR amplifies target sequences by orders of magnitude, your workspace architecture is your first line of defense. Ideally, a modern pcr laboratory should be split into distinct areas to maintain strict segregation between pre pcr and post pcr workflows.
If space and budget permit, the optimal layout requires separating these steps into different physical rooms:
- The Pre-PCR Environment: This pcr room is dedicated strictly to reagent preparation (master mix formulation) and pcr sample preparation. To keep outside contaminants and amplicon aerosols from entering, this room should maintain slightly positive air pressure.
- The Post-PCR Environment: This secondary area handles DNA amplification (thermal cycling) and downstream product analysis (such as gel electrophoresis). It should maintain slightly negative air pressure to trap amplicon aerosols and prevent them from escaping into other areas of the facility.
For smaller facilities where multiple rooms are not an option, you can configure both zones within a single pcr room. If you must use a shared space, make sure the preparation and amplification benches are separated by the maximum possible distance.
Regardless of whether you utilize a single room or a multi-room setup, enforcing a strict unidirectional workflow is mandatory. Staff and materials must only move from the clean pre-PCR preparation zone to the post-PCR analysis zone—never the reverse. If a technician must return to the preparation area after working with amplified DNA, they must completely change their personal protective equipment (PPE) to avoid transferring micro-aerosols. Implementing a temporal separation—such as preparing reaction mixes in the morning and executing amplification in the afternoon—can provide an extra layer of protection.
Essential PCR Laboratory Equipment List and Consumables Tips
To set up a high-functioning facility, you need reliable pcr lab equipment configured to minimize contact-based and aerosol-based contamination. Rather than just buying generic items, focus on selecting specialized instruments certified for molecular diagnostics. Here is an overview of what to look for when building your toolkit:
- Laminar Flow Hoods and Biosafety Cabinets: Since amplicon aerosols are a persistent risk, all master mix and pcr sample preparation steps should occur inside a dedicated laminar flow hood or a Class II biosafety cabinet. These enclosures should be equipped with UV decontamination lights and thoroughly sanitized before and after every session.
- Pipettes and Aerosol-Barrier Filter Tips: Standard pipette tips are insufficient for high-sensitivity workflows. It is essential to use certified filter tips to prevent liquid aerosols from entering the pipette barrel and causing cross-contamination between samples. To minimize tip waste, fill your reaction tubes with the master mix first using a single tip (or one set of tips on a multichannel pipette), and then add individual samples last using a fresh tip for each.
- Thermal Cyclers and Analytical Instruments: Your pcr laboratory equipment list must include accurate thermal cyclers for the amplification phase, alongside downstream analysis tools like gel electrophoresis systems or real-time PCR (qPCR) detection machines. Keep these instruments strictly within the post-PCR area.
- Consumables and Reagent Management: All plasticware—including microcentrifuge tubes, PCR strips, and multiwell plates—must be certified free of DNase, RNase, and PCR inhibitors. When new reagents arrive, immediately aliquot them into smaller, sterile vials. Aliquoting extends the shelf life of reagents by preventing repeated freeze-thaw cycles and ensures that if one container becomes contaminated, you don’t have to discard your entire stock.
Cleaning and Rigorous Contamination Control
A pristine environment is critical for maintaining experimental integrity once your facility is operational. Every surface—whether an open bench, the inside of a biosafety hood, equipment handles, or laboratory doorknobs—must be routinely sanitized. The standard decontamination protocol involves wiping surfaces with a freshly prepared bleach solution, followed by a distilled water rinse to prevent instrument corrosion.
Furthermore, incorporating rigorous experimental controls into every run is non-negotiable. Always integrate negative controls (to detect contamination in your master mix or water) and positive controls (to verify reagent functionality and extraction efficiency). Monitoring the baseline positivity rate of your assays over time will allow you to quickly detect unexpected spikes and trace them back to potential contamination events or equipment malfunctions.
Conclusion
Building or refining a molecular facility requires balancing strict spatial design with smart choices in instrumentation. By separating your pre pcr and post pcr areas, adhering to a unidirectional workflow, and selecting certified pcr lab equipment, you can establish an efficient, contamination-free testing environment that yields reliable, reproducible data.